How to hide cables for underwater pool lights
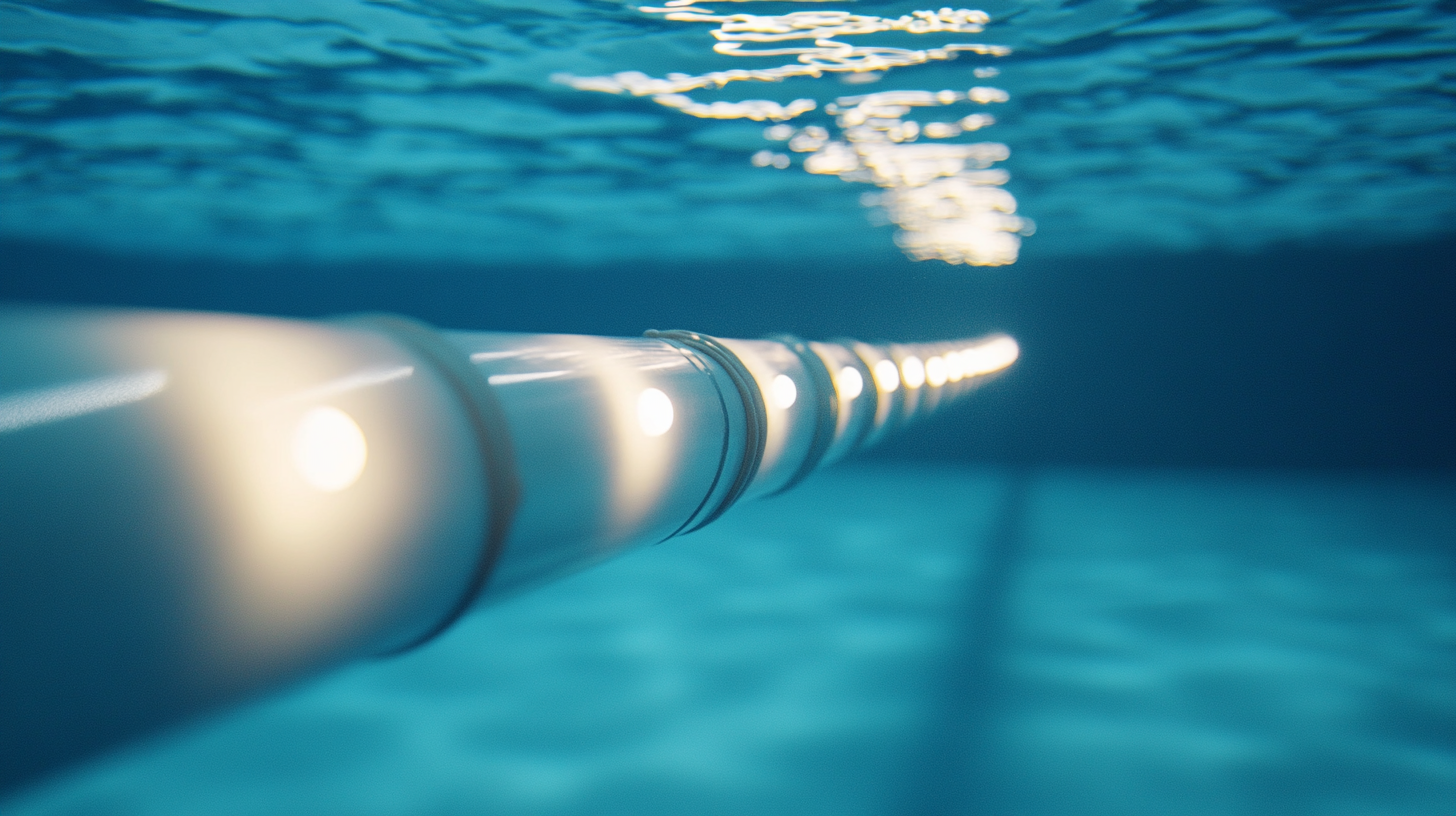
When it comes to hiding cables for your underwater pool lights, choosing the right conduit is crucial to ensure both safety and durability. A conduit is essentially a pipe that houses and protects the cables, shielding them from water exposure, chemicals, and physical damage. To keep your installation smart and secure, opting for a corrosion-resistant material is non-negotiable. PVC, for example, is one of the most popular choices due to its affordability, flexibility, and resistance to chlorine, which makes it perfect for pool environments.
You’ll want to pay attention to the diameter as well. The conduit should be wide enough to comfortably accommodate all of the electrical wires you plan to run to your pool lights, but not so wide that it becomes bulky or difficult to conceal. Standard 1/2-inch PVC works in many cases, but always confirm the cable thickness before picking the size.
Also, don’t forget to choose a conduit that has a pressure rating suitable for underwater use. Since it will be submerged, it needs to be able to withstand water pressure while maintaining its integrity over time. Spending a little more on higher-quality materials now will prevent headaches and costly repairs down the line. By selecting the right conduit, you’ll effectively hide cables while ensuring the wiring stays safe—even in a wet, humid atmosphere like your pool’s underwater zone.
Planning the cable routing
Taking time to plan the cable routing is just as important as selecting the right conduit. Before you start, consider both the aesthetic and practical aspects of where the cables will go. The goal is to hide cables effectively, making their presence invisible to anyone enjoying the pool, while also ensuring they’re safely tucked away to avoid any future maintenance issues. Look for natural paths around the pool area, such as the edges of the pool, ledges, or behind built-in features like stairs, to discreetly route your cables without too many sharp bends.
Next, think about the distance between the power source and the underwater pool lights. Knowing the total length required will help you avoid surprise extensions later, and cuts down on unnecessary complications. If the power source is far from the pool or located in a pool house, you may need to bury cables alongside your pool deck or inside the walls to hide them. And don’t forget: whenever possible, try to minimize the exposure of cables to direct sunlight above water. UV rays can weather wires, reducing longevity and increasing the risk of exposure to damage.
Make sure to account for entry points and transitions. For example, where the conduit will enter the pool area and transition into a space where it’s easy to disguise. Consider taking advantage of landscaping elements, like bushes and rocks, to further conceal visible parts of the conduit near the pool perimeter. This kind of strategic placement will not only hide cables but also give your pool a cleaner appearance without disrupting the overall design.
One final pro tip: Take note of any filtration systems or pool jets that might interfere with your chosen path. It’s essential to steer clear of anything that could potentially block access or make future troubleshooting more difficult. By carefully planning the routing upfront, you’ll not only keep the cables and conduits out of sight but also maintain easy management and accessibility when needed.
Installing the conduit underwater
Now that you’ve carefully planned your cable routing, it’s time to move on to the actual installation of the conduit underwater. First things first: you’ll want to ensure you’ve turned off all the power to the pool lights! This isn’t just a recommendation—it’s non-negotiable. Safety is key when working with electrical systems around water, so double-check to make sure everything is powered down before starting.
With the power off, start by positioning your conduit along the path you’ve already planned for. The best approach is to work methodically, beginning at the location where the conduit will exit the pool so you can guide it smoothly along its path. Depending on the material you chose earlier (hopefully, that high-quality PVC we mentioned), the conduit should have some flexibility to follow the twists and turns of the pool’s layout—whether it’s along the pool edges, stairs, or under ledges. You may also need conduit clamps or brackets to hold the pipe in place against the pool wall. These small additions aren’t just about function—they help to keep things tidy and invisible to swimmers, allowing you to hide cables without compromising on the visual appeal of the pool.
Before fully securing the conduit, “dry-fit” all of your pieces together. This simply means assembling the sections of the conduit without glue or fasteners. It’ll give you a chance to make sure everything aligns properly along your chosen route. That way, if any sections need re-routing or adjusting, you’ll catch the issue early, saving you from future frustration or having to start all over again.
Once you’re happy with the fit, begin sealing and attaching the conduit sections using an adhesive suitable for underwater use, typically a PVC solvent cement. Work in small sections at a time to maintain precision—rushing could lead to misalignments that may affect the overall durability of the installation. While assembling, do a tight check on each joint to ensure there are no gaps or leaks in the connections. Again, since we’re talking about underwater cables, every seam needs to stay watertight to shield the electrical wiring properly from water exposure.
For deeper pools, you may need to use weights or custom fixtures to keep the conduit submerged while it dries. Although PVC is light and can float before it’s completely secured, you can easily resolve this by using weighted objects or even temporarily tying down parts of the conduit. Consider environmentally-friendly materials for weights to avoid adding anything too toxic or out of place in your pool setup.
Continue working along the route toward the pool lights, ensuring you make each transition—whether it’s going around bends or inclines—smooth and accurate. Remember, each dip the conduit makes underwater is one more spot where careful attention is required to ensure everything is perfectly hidden, ensuring those cables for your pool lights never disrupt the serene swimming atmosphere!
Sealing connections for water resistance
To ensure the longevity and safety of your underwater pool light installation, sealing all electrical connections properly is one of the most critical steps. Not only does effective sealing prevent unwanted water intrusion, but it also guards the electrical components from corrosion caused by chlorine and other chemicals in the pool. If the connections are compromised, it could result in electrical shorts, potentially posing safety hazards to anyone using the pool.
Start by using waterproof junction boxes to house any connections between the cables and the lighting fixtures. These boxes should be rated for underwater use and must have a sufficient IP rating (Ingress Protection) to prevent water ingress. The ideal rating for submerged applications is IP68, which indicates that the device is completely protected against both dust and prolonged immersion in water. Ensure that each junction box has a fitting O-ring gasket to provide a watertight seal once closed.
For the connections themselves, use heat shrink tubing with a heat-activated adhesive lining. This tubing provides a snug fit and creates a second layer of protection over the wire joints inside. Start by placing the tubing over one of the wires before twisting or crimping the wires together, depending on your choice of connector. Once the connection is made, slide the tubing over the joint and apply heat with a heat gun or hairdryer. The combination of heat and adhesive will shrink the tubing around the wiring connection, creating a secure, water-resistant barrier. Make sure that the tubing extends fully over the joint, providing coverage on either side of the connection.
Additionally, you may wish to reinforce the integrity of the seal with silicone sealant—specifically made for electrical applications. Apply the sealer around the entry and exit points where cables enter the junction box and around any other points that might be prone to water seepage. Marine-grade sealants are especially recommended since they are designed to hold up under prolonged water exposure, extreme temperatures, and the high chlorine content often found in pools.
Don’t overlook cable glands—these essential components ensure the cables entering or exiting waterproof enclosures are sealed tightly. Installing the appropriate size strain relief cable glands provides dual functionality: reinforcing water resistance and reducing the mechanical stress on the connection points, which can loosen or break over time if not properly managed.
Once your connections are sealed, test them before permanently securing everything. This includes temporarily powering up the pool lights (with the pool dry and outside electrical outlets turned off) to ensure that everything works flawlessly. It’s crucial to perform this dry test before your final submersion to avoid costly reworks later. After testing, the connections can be submerged, confident that water won’t penetrate and affect the integrity of the system.
Lastly, regular maintenance involves periodically inspecting all sealed areas for any signs of wear or degradation. Look out for cracked or peeling heat shrink, degraded silicone, or loosened cable glands, and make replacements or adjustments as necessary to maintain the watertight integrity of the entire system. Hidden cables are only effective if the electrical system behind them remains functional and secure over time, so preventative measures now will save time and effort in the future.
Testing and maintaining the hidden cables
Once you’ve completed the installation of the cables and connections, it’s time to ensure everything is not only hidden but working as it should. The last thing you want is to go through all the effort of hiding your pool light cables, only to discover that something’s not quite working during your next evening swim. Regular testing and maintenance are essential to both the safety and longevity of your underwater pool light setup, which, after all, is submerged in an environment that’s constantly exposed to water, chlorine, and wear and tear.
To begin with, let the system run for a couple of hours after your initial installation and sealing is complete. Pay close attention to potential issues such as flickering or delayed lighting responses, which could indicate an issue with the wiring or water intrusion. Always do this testing before filling or refilling your pool to its full water level, as it’s much easier to troubleshoot any issues in a dry environment.
Once everything appears to be functioning well, move forward with a more thorough inspection by turning off the power source and checking all connection points and conduits for any signs of leaks or dislodging. Even though the cables should be well-hidden, an underwater environment is unpredictable, and slight disruptions such as shifting pool tiles or water currents might interfere with even the best-laid plans. Reinforce any weak points before permanently settling back into your pool’s normal usage.
After the initial setup, you’ll want to schedule periodic checks to ensure your pool lights continue to work efficiently. Over time, wear and tear from underwater conditions can cause potential issues, such as corrosion, cracks in the conduit, or loosening of waterproof seals. These inspections don’t need to be frequent, but performing a check at least once a season will keep your lighting system in top condition. You can use a simple checklist to examine points where cable glands and junction boxes exist—the usual suspects when it comes to water seepage.
One of the easiest ways to prevent your hidden cables from facing long-term damage is through routine cleaning of your pool’s water to minimize the build-up of contaminants that float around, including dirt, algae, and leaves. While normal debris won’t harm your waterproofed electrical system, keeping the water clear will reduce the overall stress on any exposed parts of the conduit, especially around bends and angles where things like dirt and grime tend to settle.
If you notice any issues like dimming pool lights or even electrical tripping during your usage, it may be a sign that water has breached one of your connections or that part of the conduit has failed. In these cases, it’s crucial to act quickly. Turn off the power immediately and have the system assessed to prevent further complications, which could lead to potential safety issues.
A key part of testing and maintaining a hidden cable system for your underwater pool lights is correcting anything that appears out of place before problems arise. Re-tighten cable glands, apply fresh sealants to any noticeable cracks or worn-out seals, and don’t hesitate to replace shorter lengths of conduit if you see persistent wear in certain areas. Proactive steps will help you avoid a major headache down the line, allowing you to preserve that sleek, uninterrupted look around your pool for many years to come.