The installation process of surface-mounted vs flush-mounted underwater boat lights
When it comes to choosing the best type of underwater lights for your boat, it’s important to first understand the key differences between surface-mounted and flush-mounted designs. Both types serve the same basic purpose – they light up the water around your boat – but they have distinct advantages and drawbacks that could influence your choice depending on your needs and the overall installation process.
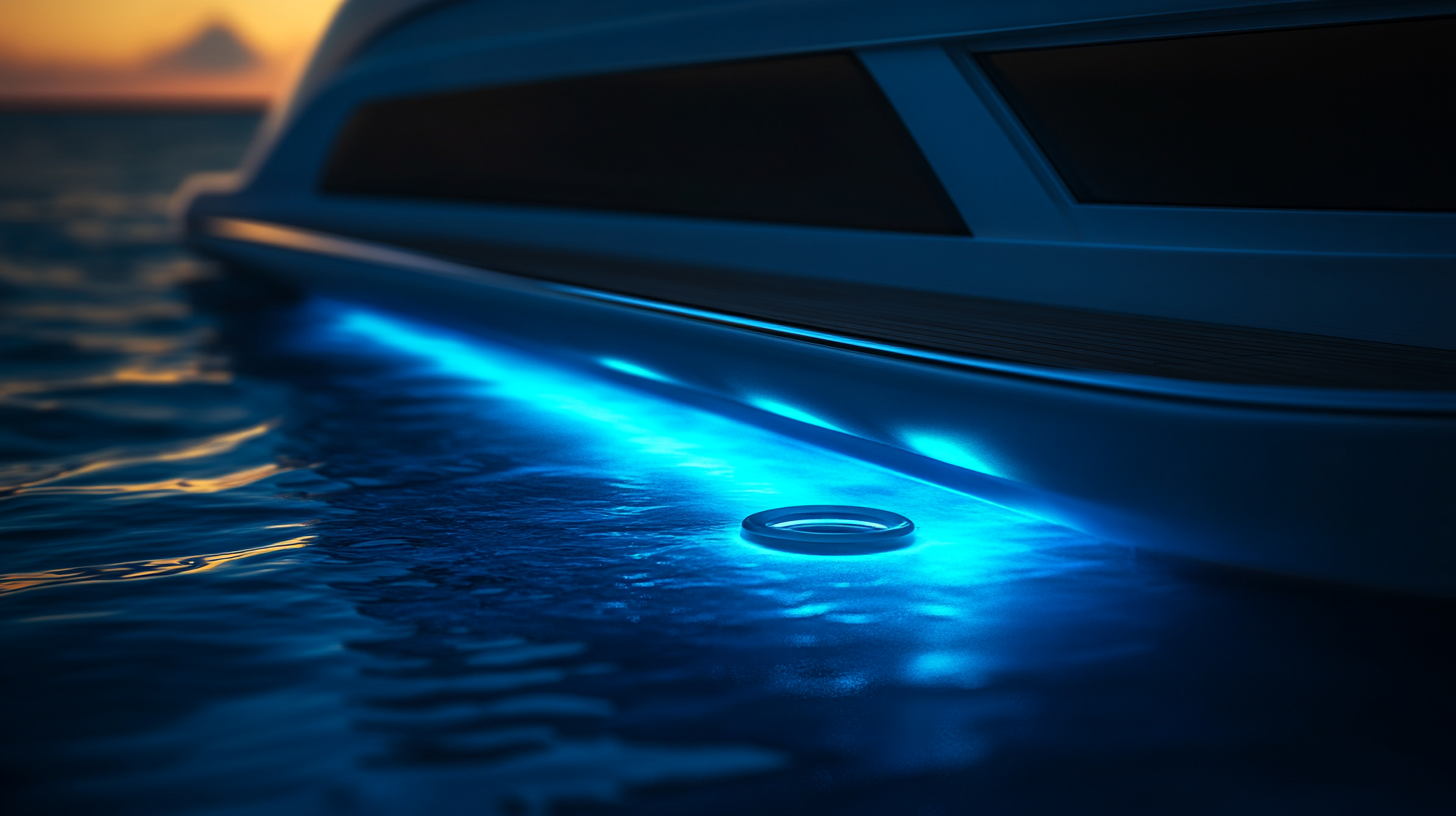
Surface-mounted lights are installed directly on the hull’s exterior. They sit above the surface and don’t require drilling large holes into the boat, which can be a big plus if you’re not a fan of invasive work. These types of lights are relatively easy to install, making them popular for DIY boat owners. You simply attach the light to the hull using screws and a small hole for wiring, which reduces risk and complexity. However, the downside is that since these lights are not flush with the hull, they may protrude slightly, creating drag when you’re moving through the water.
On the other hand, flush-mounted underwater lights are installed almost level with the boat’s surface by recessing them into the hull. While this more streamlined design reduces drag and contributes to a sleeker aesthetic, the installation process is definitely more complicated. You’ll need to cut larger holes in your boat’s hull to accommodate the light unit. If you’re concerned about performance in high-speed conditions, flush-mounted lights may be your best bet since they don’t interfere with the boat’s flow through water. However, the more complex installation could mean hiring a professional or being prepared for some more advanced work.
Ultimately, the decision between these two options comes down to your technical comfort level and how you primarily use your boat. Some boaters prioritize easy installs, while others value performance and a cleaner look. The good news? Both styles of underwater lights offer great illumination and can enhance your boating experience whether you’re out fishing at night or simply enjoying a nice evening on the water.
Tools and materials required
Before starting the installation process of either surface-mounted or flush-mounted underwater lights, it’s crucial to gather the necessary tools and materials to ensure a smooth and trouble-free job. Proper preparation will save you valuable time and reduce any potential frustrations down the line. Depending on the type of lights you’re installing, your tool and material list may vary slightly, so we’ll cover the essentials for both types.
First things first, you’ll need a drill. For surface-mounted lights, the primary hole will be for the wire feed, which usually requires a smaller drill bit, often ranging between 1/4-inch and 1/2-inch in size. For flush-mounted lights, on the other hand, you’ll need a hole saw larger enough to accommodate the full light housing – a more significant cut, roughly between 2 to 3 inches in diameter depending on your light model. Make sure you have the correct size as making the wrong cut on your boat’s hull can certainly dampen the process!
Next on your list will be sealant—marine-grade, of course. Water and electronics aren’t exactly the best of friends, and this glue-like material will help you secure the installation and protect the interior electrical components from water intrusion. For flush-mounted lights, you’ll also want to ensure you get a durable, waterproof gasket to create an extra seal between the light and the hull. This is critical to prevent water leaks.
You’ll also need a screwdriver or a power drill with appropriate bits for fastening screws or bolts as required for your light model. Surface-mounted lights are generally held in place with screws that you can insert quickly through pre-drilled holes, while flush-mounted lights may come with bolt-like fasteners that embed deeper into the hull.
Don’t forget to stock up on wiring basics, including marine-grade wire, crimp connectors, heat-shrink tubing, and often a marine-grade switch or controller. It’s important to make sure your wiring is up to task, especially for underwater lights where exposure to moisture and salt can create wear and, if not careful, electrical failures. Be sure to pick up dielectric grease, which helps create a moisture-resistant barrier around your wiring connectors for a longer-lasting setup.
If you’re adding a new switch for your lights, you’ll likely need a wire stripper and crimper to prepare the connections; a good-quality voltage tester can also come in handy to make sure everything is working correctly before you seal it all up. Electrical tape is another must-have to keep connections clean and well-insulated, minimizing the chance for shorts or failure over time.
For flush-mounted installations, prepare for a bit more intensive work by including a measuring tape, painter’s tape, and a grinding tool if you need to adjust the edge of your cut to fit the light housing perfectly. The painter’s tape will help guide your cuts and keep your hull’s surface protected during the installation process—you’ll thank yourself later!
Lastly, don’t overlook safety gear. Have on hand protective gloves, safety goggles, and additional gear to ensure you can work confidently through the drilling, wiring, and other hands-on processes without risking injury.
Step-by-step guide for installing surface-mounted underwater lights
Installing surface-mounted underwater lights is a relatively straightforward task even for those who are new to boat modifications. By following a clear step-by-step approach, you can have them installed in no time, bringing vibrant illumination to your boat’s wake. Here’s a comprehensive breakdown of how to install surface-mounted underwater lights safely and efficiently.
The installation process begins by selecting the exact position for your lights. Typically, surface-mounted underwater lights are installed low on the transom, or rear, of the boat, where they’ll offer the best illumination of the surrounding water without getting in the way of vital components like trim tabs. Once you’ve decided on the location, use a marker to plot the points where you’ll need to drill. Double-check that your selected area is clear of any wiring or internal fixtures that could be damaged during the drilling process.
After marking your drill points, grab a power drill with a bit suited to the size of your wiring hole—most surface-mounted lights require a modest hole, usually around 1/4-inch to 1/2-inch in diameter, just large enough to feed through the electrical wiring. Some light models may have an additional smaller guide hole for mounting screws, so ensure you have both a small and large drill bit handy. Take care to drill at a steady pace to avoid chipping the boat’s exterior or making uneven holes.
Once the hole is ready, fish the wire through, ensuring it travels smoothly to the inside of the boat where it will later connect to your power source. You’ll want to coat the edges of the hole and the wire entry point with a marine-grade sealant. This will prevent any leaks or water damage over time—a crucial step, as water intrusion can quickly lead to electrical failures. Don’t skimp on this—waterproofing is your best friend when working on an installation like this!
Next comes the fun part: attaching the light to the hull. Apply sealant to the back of the light fixture itself, making sure to focus on the area where the fixture will contact the hull surface. This helps with waterproofing and offers some extra adhesion to keep the fixture securely in place. Once you’ve applied enough sealant, position the light over the wire hole and secure it with the mounting screws or bolts provided in your kit. Use a screwdriver or drill to fasten the light snugly, but be careful not to overtighten, as this could crack the fixture or strip the screws. The light should sit firmly on the hull without any noticeable wobble or looseness.
Now that the light is physically installed, it’s time to connect the wiring inside the boat. Using marine-grade wires, connect the power line to your boat’s electrical system. For safety and durability, crimp all connectors tightly, then cover them with heat-shrink tubing to create a strong, waterproof bond. Apply dielectric grease over the connections to add an extra layer of moisture protection. For best results, route the wire connections to a marine-grade switch, allowing you to easily turn the lights on and off from the helm. Make sure the wiring is also fused according to the manufacturer’s specifications to avoid potential electrical overloading.
Once your wiring is in place, grab your voltage tester and check your work. Flip the switch (figuratively and literally!) to make sure everything lights up as expected. If you run into any issues, like a flicker or total darkness, double-check your connections for loose wires or faulty crimps, and test the fuse to ensure it’s functioning properly. Electrical troubleshooting can be a little finicky, but taking the time to check now can save major headaches later on.
Finally, once you’ve confirmed everything is working, apply a bead of additional sealant around the outer edge of the light. This seals off any tiny gaps you might have missed earlier and ensures that your newly installed underwater lights are watertight. Clean up any excess sealant with a damp cloth before it has time to cure, and allow everything to dry for the recommended duration before launching your boat back into the water.
In no time, your boat will be equipped with glowing surface-mounted underwater lights that enhance not just the atmosphere but also your safety when out at night. The ease and relative simplicity of this type of installation make it a popular choice for DIY enthusiasts looking to give their boat that extra dash of personality.
Step-by-step guide for installing flush-mounted underwater lights
Installing flush-mounted underwater lights involves a more meticulous and advanced installation process than surface-mounted varieties. Because flush-mounted lights are recessed into the hull, careful planning and precision are key to ensuring a successful and watertight installation. Here’s a step-by-step guide to help you get them in place safely and securely:
Step 1: Select the Mounting Location
The first decision to make is where to install the flush-mounted light. The most common location is on the transom (the rear section of the boat), where the lights will provide maximum visibility in the water without interfering with critical components like trim tabs or rudders. Ensure that the location is well below the waterline for optimal illumination.
Use painter’s tape to mark the general area where you plan to mount the lights. This will allow for slight adjustments as needed and will help protect your hull’s surface while you work. Double-check that no internal components, such as wiring or fuel lines, are directly behind the marked area to avoid any damage during the drilling process.
Step 2: Measure and Mark for the Cut
Once you’ve chosen the location, it’s time for precise measurements. The diameter of the hole will depend on the dimensions of the flush-mounted light. Use a hole saw that matches the required diameter for the light housing. For most flush-mounted underwater lights, a hole between 2 to 3 inches is typical, but consult your manufacturer’s instructions for the exact dimensions.
Measure twice and mark the center where the hole will be cut. Use a level to ensure that everything is properly aligned; uneven placement can cause issues with lighting orientation and may affect the overall waterproofing of the installation. Apply painter’s tape over the area where you will cut the hole to avoid chipping the boat’s gel coat when drilling.
Step 3: Drill the Hole
With your location set and marked, grab your drill equipped with the hole saw. Drill slowly and carefully to avoid damaging the hull. Steady, controlled pressure is key here: rushing can lead to uneven cuts or cracking.
After drilling the hole for the light housing, smooth out any jagged edges using a grinding tool to ensure the light will sit perfectly flush with the hull. Also, drill any required screw holes around the perimeter of the main hole, positioning them according to your light’s mounting plate.
Step 4: Dry Fit the Light and Prepare the Wiring
Before permanently installing the light, test-fit it into the hole to make sure it fits flush with the hull surface. The light shouldn’t protrude or sit too deeply; it should be nearly level with the boat’s exterior to reduce drag and ensure optimal aesthetics.
Next, fish the wiring through the hole to the inside of the boat. For flush-mounted designs, it’s critical to take extra care with the wiring as you’ll have less room to maneuver once the light is seated. It’s helpful to have an assistant inside the boat to guide and pull the wire through. Ensure you leave enough slack so that the wire isn’t pinched or strained once the installation is complete.
Step 5: Seal the Hole
Now that the light is test-fitted and wiring is through the hull, remove the light and apply a marine-grade sealant around the perimeter of the hole. Make sure to use a sealant specifically designed for underwater applications, as the hull will be submerged. This will prevent leaks and water from seeping into the boat, protecting the electrical components inside.
Also, apply a waterproof gasket (if included with the kit) to the back of the light fixture to help create an additional seal between it and the boat hull.
Step 6: Mount the Light
Once the sealant and gasket are in place, you can insert the light fixture into the hole for the final fit. Align the light with the pre-drilled screw holes and use the provided mounting screws or bolts to secure it tightly against the hull.
It’s important not to overtighten the screws, as this could damage the light or the hull. Tighten them just enough to hold the light snugly in place.
Step 7: Complete the Electrical Connections
With the light affixed to the hull, move inside the boat to connect the wiring to your power source. Use marine-grade crimp connectors to attach the light’s wire to your existing electrical system, ensuring a secure and watertight connection. Heat-shrink tubing should cover all connections to insulate them from potential moisture exposure.
Apply a liberal amount of dielectric grease to your electrical connections to prevent corrosion and improve longevity in the harsh marine environment. Attach the wiring to a dedicated switch on the boat’s console to control the lights.
Step 8: Test the Lights
Before sealing everything up, test the newly installed lights with a voltage tester. Turn on the power and ensure the flush-mounted lights illuminate as expected. If everything looks good and the lights are working properly, proceed to the final sealing phase.
If your lights aren’t turning on, check for loose connections, faulty crimps, or blown fuses. It’s always better to identify and correct any issues before completing the installation.
Step 9: Final Sealing and Waterproofing
Once you’re satisfied that the lights function correctly, go back and apply an additional bead of sealant around the mounting perimeter on the hull exterior. This final layer will cover any small gaps and ensure a watertight finish.
After applying the sealant, clean any excess using a damp cloth and allow everything to dry in accordance with the sealant manufacturer’s recommended curing time, generally 24-48 hours. It’s important to give the sealant adequate time to fully cure before taking the boat out on the water.
| Step | Tools & Materials Needed |
|---|---|
| Measure location and mark for drilling | Tape measure, painter’s tape, marker |
| Drill the Hull | Hole saw (2-3 inches), power drill |
| Apply sealing components | Marine-grade sealant, waterproof gasket |
| Mount the light | Mounting screws, screwdriver |
| Wiring process | Marine-grade wire, heat-shrink tubing, dielectric grease |
By carefully following these steps, you’ll have a sleek setup of flush-mounted underwater lights that blend perfectly into the boat’s hull, all while maintaining high-performance illumination.
Maintenance and troubleshooting for underwater lights
Once you’ve installed your surface-mounted or flush-mounted underwater lights, the work doesn’t stop there. Proper maintenance is critical to ensuring their longevity and continued functionality. Regular upkeep can prevent malfunctions and extend the lifespan of the lights, saving you from costly replacements down the line.
One of the first things to keep in mind is regular cleaning of the lights. Underwater lights are constantly exposed to all sorts of debris, algae, barnacles, and other marine growth that can accumulate over time. For surface-mounted lights, these obstructions can reduce the brightness or cause the light to look hazy when submerged. Flush-mounted lights are less likely to trap large debris thanks to their sleek design, but they are by no means exempt from the effects of biofouling. Every few weeks, particularly during the boating season, take time to clean the lens of your lights. Use a soft brush or cloth and a mild, marine-safe cleaning solution to wipe away dirt, grime, and algae. Avoid abrasive cleaners or hard scrubbing tools, as these can scratch the lens and degrade your lights’ performance.
Along with clean lenses, you’ll also want to periodically check for loose screws or fittings, especially for surface-mounted models that are more exposed to the physical strains of water movement. Vibrations from regular boating use, as well as water pressure while moving at higher speeds, can loosen screws over time, leading to increased risks of water intrusion or even a potential light coming dislodged. A quick check of all mounting points every couple of months can help you catch any issues before they become serious problems.
For both surface-mounted and flush-mounted lights, it’s essential to inspect the silicon sealant and gaskets that protect the electrical connections. Even the most watertight installation process can wear down over time due to exposure to harsh marine conditions like UV rays, saltwater, and varying temperatures. Inspect the sealant around the edges of your lights and replace any portions showing signs of cracking or wear. If you notice any water intrusion or moisture around the mounting area or inside the lights, it’s a good sign that the seal or gasket has failed, and immediate repair is necessary.
Speaking of water intrusion, moisture is the nemesis of any electrical system, and underwater lights are no exception. A critical part of maintenance is routinely checking the electrical connections inside your boat. Over time, saltwater and moisture can creep into these components, leading to corrosion. This is where the dielectric grease you used during installation comes in handy, providing a barrier between electrical contacts and moisture in the air. Make it a habit to inspect wiring, connectors, and fuses for any signs of corrosion or damage. If you spot greenish deposits around the terminals or notice brittle wires, it’s time to replace them or reapply anti-corrosion solutions to protect against further damage.
Troubleshooting underwater lights may seem daunting at first, but in many cases, the problem can be quickly identified by logical steps. First, if your lights aren’t functioning at all, the issue could be in the electrical system. Ensure that you’re getting power to the lights by checking your fuse and switch. A blown fuse is often the culprit for sudden power loss. If the fuse appears fine, check the wiring connections next. Sometimes a loose crimp or connector can disrupt the electric current, preventing the lights from turning on.
If your boat’s underwater lights are flickering, consider the possibility that your battery is underpowered or poorly connected. In cases where there is inconsistent power coming from the source, such as with weak batteries or corroded connections, your lights may strobe or fail intermittently. This can be especially troublesome for LED models that require a stable, sufficient voltage to function correctly. A voltage tester can help you diagnose most power-related problems. Be sure your boat’s battery is in good condition, fully charged, and providing a steady flow of electricity to your lighting system.
For a more specialized issue like dimming lights, the problem could be either debris buildup covering part of the light, or subtle water intrusion affecting the light’s internal components. Check the lenses first; if they’re clean and debris-free, inspect for any signs of leaks or moisture inside the housing. If any water has penetrated the light fixture, it’s best to tackle the issue immediately. Drain the light, dry any affected components, and reapply sealant to prevent further problems.
Lastly, if your boat operates in colder regions, remember that temperature fluctuations can stress both the light components and the hull they’re attached to. Rapid expansions and contractions can sometimes compromise the watertight seal over time. During colder months, make it a habit to inspect your lights more frequently and try to avoid starting your boat when there’s a stark temperature difference between the air and water, as this could exacerbate the issue. The best prevention is being proactive about resealing and maintaining the lights before it comes to that.
