Winterizing your underwater pool lighting system

As the colder months approach and poolside activities start to wind down, many pool owners tend to focus solely on covering their pool or maintaining water quality. However, overlooking your underwater lighting system can lead to costly repairs or even dangerous malfunctions. Winterizing your pool lights is not just an optional step—it’s an essential preventive measure that prolongs the lifespan of your equipment and ensures your pool is ready to shine again come spring.
When temperatures drop, water expands as it freezes, which can easily damage electrical components if you’re not careful. This pressure can crack the casing around your lights, potentially leading to water infiltration and electrical shorts. Moreover, cold weather can cause rubber seals to degrade over time, allowing moisture to seep into areas that should remain completely dry. And let’s be honest—no one wants to deal with flickering lights or non-functional pool lights right when you’re looking to reopen your oasis after a long winter.
Taking the time to winterize helps protect your investment and avoid dealing with emergency fixes in the future. After all, a little preparation goes a long way in ensuring a stress-free pool maintenance experience once summer rolls around again!
Inspecting the lighting components for wear and tear
Before you even think about draining water or sealing up electrical connections, it’s essential to first inspect all of your lighting components for wear and tear. Over time, even the most well-installed pool lights can experience degradation due to prolonged exposure to water, chlorine, and fluctuating temperatures. By catching potential issues during your inspection, you reduce the risk of costly repairs, or worse, a complete lighting system failure once the weather warms up again.
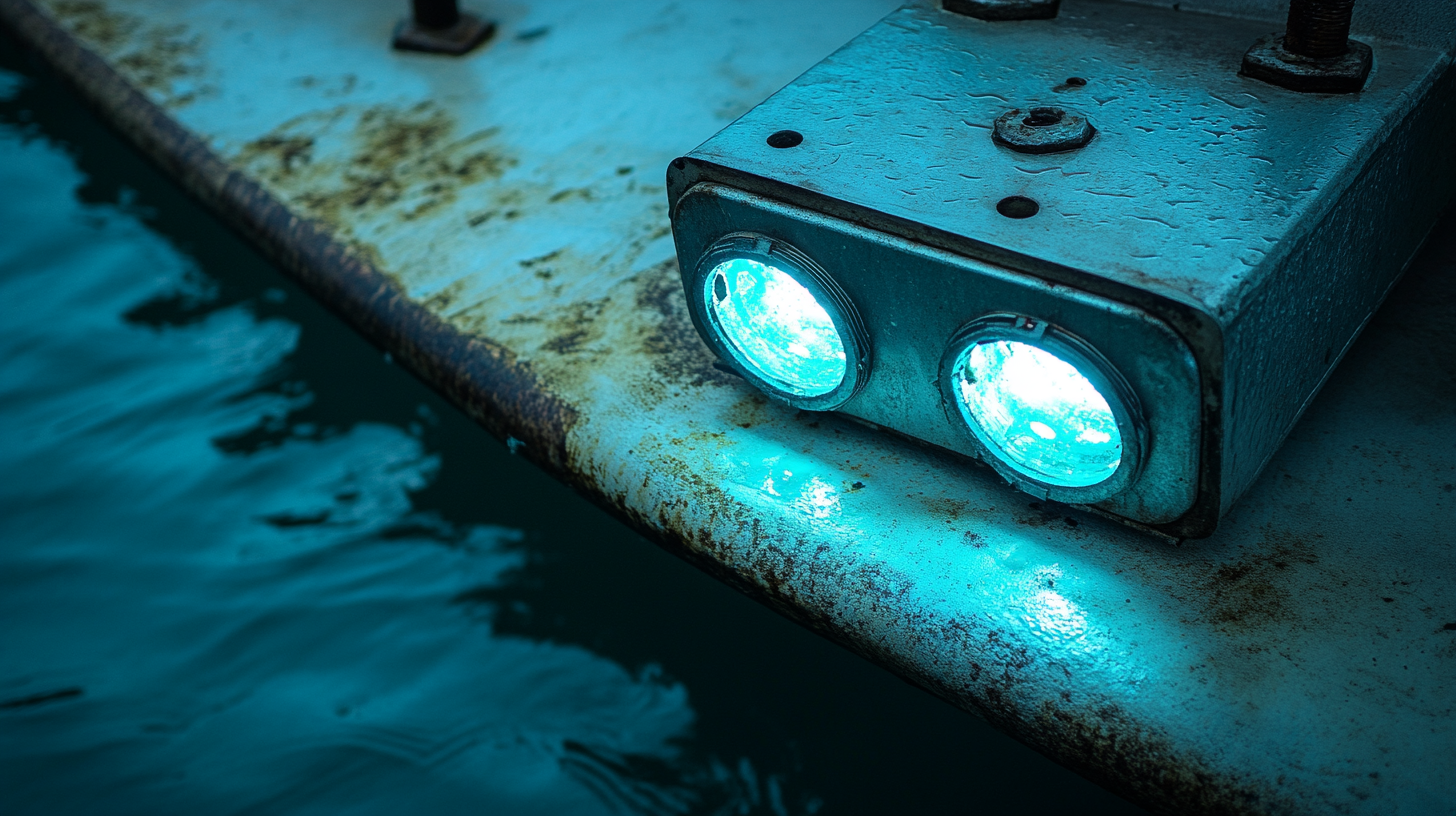
Start by examining the light lenses themselves. Look for any cracks or chips in the glass or plastic, which can easily worsen during winter, especially in freezing conditions. Those small imperfections might not seem like a big deal now, but as ice forms and expands, even a tiny crack can become a major problem, allowing moisture to seep into the lighting fixture. And trust us, water inside your light fixture is never a good thing! You’ll want to make sure all light lenses are intact and fully capable of keeping moisture out during the colder months.
Next, check the rubber gaskets or seals around the lights. Gaskets provide a crucial barrier to prevent water from leaking into areas that are meant to be dry. However, exposure to pool chemicals and general wear can cause these seals to become brittle over time, which leads to leaks. If you notice dry, cracked, or overly stiff rubber, it’s time to replace the gasket before you even think about winterizing your lighting system. Much like with the lenses, small unnoticed issues can cause significant damage later if not addressed.
You’ll also want to examine the housing or fixture casing. Have you noticed any signs of corrosion starting to appear around the lights? Even in pools with perfectly managed water chemistry, metal casings can sometimes corrode around the edges, especially if you have saltwater pool systems, which can be rough on metal over time. Early signs of rust can indicate that the fixture isn’t as secure as it once was, leading to problems down the road, and winter will only accelerate that process. Be vigilant—catching this now means you can swap out worn components before anything worsens.
If your lighting system is also controlled by any external elements such as automations or switches, examine those components. Ensure wires aren’t frayed, and electrical boxes or timers are sealed tightly. Overlooking these parts during your inspection can lead to connectivity issues or even worse, electrical hazards in the future.
Taking these steps is critical for ensuring your pool lights are ready to be effectively winterized. By addressing wear and tear head-on, you’re safeguarding against the kind of issues that can transform a simple pool lighting fix into a complex—and expensive—repair later. It’s much easier to spend some time inspecting now rather than deal with a midwinter disaster caused by neglected maintenance.
Draining water from lighting fixtures
Once you’ve thoroughly inspected your pool lights and any signs of wear and tear have been addressed, the next step is to drain any water trapped within the lighting fixtures. It’s tempting to leave this step out, especially if you’re pressed for time, but trust us—this is one task you absolutely don’t want to overlook when winterizing your underwater lighting system. If water remains inside the fixture and temperatures drop below freezing, that water will expand. This expansion can result in severely damaged internal components, cracked housing, or even broken bulbs. Plus, leaving water inside increases the likelihood of electrical shorts, and no one wants to deal with that come swim season.
Start by carefully removing the underwater lighting fixture from its niche. You’ll typically find the fixture secured by a single screw, often located at the top of the housing. Once removed, gently pull the fixture up and out of the water, allowing it to rest on the pool’s deck. Be sure to keep a close watch on the wiring as you do this. It’s important not to yank the cord too forcefully as this could damage the electrical connection—remember, we want to prevent fixing one problem only to create another!
Now that you have the fixture on solid ground, it’s time to remove any moisture that may still be trapped inside. Start by inspecting the housing to see if there’s visible water present. If water is present, you’ll need to drain it by either tipping the light upside down, or using a small cloth or sponge to gently absorb the remaining liquid. Some light designs may even have a drainage hole, specifically to help evacuate condensation that can collect over time. Make sure that this hole is clear and functional, as any blockage could prevent water from draining properly. Wipe everything down as thoroughly as possible so that no residual moisture remains—the drier the better!
If your pool lights have a removable lens cover, now’s the time to take it off and check for water buildup inside the bulb casing itself. Although this might seem like overkill, even the slightest bit of moisture trapped in there can lead to condensation or corrosion over the harsh winter months. With the lens cover removed, gently dry out the interior, being particularly careful with the bulb and reflective surfaces to avoid any damage. The goal here is to ensure the entire inside of your fixture is completely moisture-free before you move on to the final steps of your winterization process.
While you have your fixture out of the water, this is a fantastic time to double-check those rubber gaskets or O-rings one more time. If they’re deteriorating or already showing signs of wear, now is the ideal time to replace them before you reseal the light. Once replaced (or if they’re still in good condition), make sure to reseat the gasket properly to maintain that watertight seal over the coming winter.
Return the fixtures to their underwater niche once everything is dried and secure, ensuring they are properly fastened and seated. Proper reinstallation is essential to prevent any complications when you reopen the pool. If everything’s done correctly, your lighting system will be prepped to withstand everything winter has to throw at it, and your pool lights will be ready to shine brightly once warmer weather makes its return!
Sealing and protecting electrical connections
Once you’ve successfully drained all the water and ensured the fixtures are bone dry, the next priority is to secure and protect the electrical connections. Winterizing your underwater lighting system involves more than simply protecting the lights themselves; without proper care of the wiring and electrical components, all that hard work could be wasted. Electrical issues during the winter can lead to malfunctions that not only kill your pool lights, but could also pose serious safety risks once your system is back in operation.
Begin by locating the junction box or external housing where your lighting system’s electrical connections are made. Since this box is often located above the waterline—commonly positioned near the pool deck or nearby landscaping—many pool owners mistakenly assume that it doesn’t require special winter care. However, cold temperatures combined with moisture can still cause serious problems if the electrical components are not properly secured. The aim is to keep all connections insulated and sealed against moisture while also ensuring the box is tightly secured to prevent any water from sneaking in due to rain, melting snow, or condensation.
First, open the junction box and inspect each wire connection. Watch out for any corrosion or loose wires. If the wire terminals show signs of rust or oxidation, consider either replacing the affected components or cleaning them to ensure a secure connection throughout the winter. A corroded connection could cut off power or worse—it might cause an electrical short when spring arrives, leading to costly repairs or potential safety hazards.
Once the wiring is inspected and looking good, the next step is to properly seal the connections. To do this, use specialized weatherproof wire connectors or marine-grade heat-shrink tubing. These materials are designed to provide a watertight seal, protecting your electrical connections from moisture. If you’re using heat-shrink tubing, slip the tube over each individual wire connection, and then apply heat (usually with a heat gun) to shrink it tightly around the wire and its terminal. The plastic tubing will firmly grip the wire and create an insulated barrier to shield it from moisture or freezing conditions throughout the winter months.
As an added layer of protection, apply dielectric grease to the wire terminals before sealing them. This non-conductive silicone grease helps further prevent corrosion—and it’s especially useful for underwater pool lighting systems, which are frequently exposed to chlorine, salt, and harsh environmental conditions. Simply squeeze a small amount of dielectric grease around the metal connections before you cover them with connectors or heat-shrink tubing. This extra step ensures that when pool season returns, your lights will have a reliable, corrosion-free connection.
After properly securing and sealing each wire connection, it’s crucial to double-check the junction box’s own seal. If the box has rubber gaskets or a sealing mechanism, make sure it’s still intact and flexible. If these gaskets are damaged or brittle, replace them to maintain a watertight seal. If your pool lighting system includes an automated control box or timer, open up that box for inspection as well. Ensure that all interior components are dry, and if possible, apply weatherproof covers or ensure any built-in seals are in good condition. Just as with underwater lighting fixtures, neglected seals or brittle materials in your control box can lead to moisture intrusion that may cause system-wide electrical failure down the road.
Finally, close up the junction box securely and, if available, use additional weatherproof covers designed specifically for outdoor electrical equipment. These covers add another level of protection by keeping out rain and snow, and they help prevent freezing temperatures from making their way into the sensitive electrical areas. A well-sealed junction box ensures that all the electrical components work as they should when you’re ready to bring your pool lights back to life in the spring.
By taking these comprehensive steps to insulate and shield all electrical connections, you ensure that your lighting system remains waterproof and weather-resistant during the harsh winter months.
Final checklist for winterized underwater lighting
Now that all of the crucial steps have been completed, it’s important to run through a last-minute checklist to ensure everything has been properly winterized. By paying attention to the details now, you can avoid springtime setbacks like flickering pool lights, waterlogged fixtures, or worse—broken electrical systems. Winterizing a lighting system is a multi-step process, and each aspect needs to be addressed carefully to maintain your setup over the cold months.
First, confirm that you conducted a thorough inspection of the overall lighting system. This is your opportunity to double-check those small details, like any cracks in the light lenses or minor wear on the rubber gaskets. Even a seemingly insignificant fissure can worsen in freezing temperatures. Ensure all lights were visually inspected for chips, aging seals, or any signs of corrosion on the metal housings. Remember, small issues now can lead to expensive and complex repairs down the line.
Next, confirm that all fixtures have been properly drained and sufficiently dried. Any leftover water inside a lighting fixture can freeze and expand over the winter, potentially causing cracks in the casing or serious damage to the internal components. Even a tiny droplet of water left in the wrong place can freeze into a mini-ice block that wrecks your pool lighting entirely. Double-check that there’s no lingering moisture inside each fixture, especially in the bulb casing area, since moisture here can lead to condensation and long-term corrosion. The key at this stage is ensuring each fixture is bone dry. If you didn’t already, inspect the drainage holes built into some fixtures to check that they’re clear of any debris that might block water drainage.
Move on to review the status of the gaskets or O-rings around the lighting fixtures one last time. These small rubber or silicone seals are responsible for keeping water out, and when they’re dry or cracked, they lose efficiency. If necessary, replace old seals with fresh, flexible gaskets to ensure that watertight barrier remains intact all season long.
Check the secure reattachment of each light to its underwater niche. Ensure that it’s not only properly mounted but also tightly secured so that there’s no chance of movement or water infiltration during storms or temperature fluctuations. If your fixture or bracket feels loose, tighten screws until it’s firmly in place. A wobbly fixture can allow small amounts of pool water to seep in, damaging electrical wiring within.
Shifting focus, verify that all electrical connections have been correctly sealed and protected. Did you apply those weatherproof wire connectors or heat-shrink tubing to all exposed wires? Did you seal them with dielectric grease to further prevent corrosion? Your junction box or control panel should be tightly closed with no visible gaps, and its rubber gaskets should still be flexible and fully intact. If any of these connectors or boxes show signs of wear, you’ll want to replace them before sealing them up for winter to safeguard the wiring.
Finally, cover all external components with any weatherproof coverings you have on hand. Automated control boxes, timers, and even your junction box can all benefit from this added protection. If snow, rain, or even dense frost makes its way into these components, none of those painstaking winterizing efforts will save your system from electrical malfunctions.
Once you’ve checked off each of the above items, take a quick inventory of any spare parts you might have stocked up. Did you replace any gaskets, and do you have extra materials on hand? What about cleaning supplies for the lenses, or grease for the electrical connections? Having spare components ready now will make opening your pool a much smoother process in the spring.
Winterizing your pool lighting system isn’t just an extra task on the seasonal to-do list—it’s a vital step to ensure your pool lights are safe from the damage an unforgiving winter can bring. By systematically checking these final details, you not only avoid unwanted electrical surprises next season but also extend the lifespan of your pool’s entire lighting system. For those passionate about keeping their pool area shining bright, a little winter care pays off in a flicker-free, well-lit oasis when it’s time to dive back in.